
Hello all,
This is gonna be a a short blog as it is supposed to be a tutorial for my friends kekeke ^^.
The Problem:
**************************************
I'll get directly to the point!! almost three weeks ago, I had to install openCV library on my laptop for an assignment. I thought, well, it is a very VERY famous library.. it's gonna be a piece of cake.. Let's say, I THOUGHT WRONG!!!
Of course, I instantly went to my good friend Google for advice on how to install the library on a Mac OS X 10.8 (Mountain Lion) Macbook Pro. I got lots and LOTS of tutorial. I've actually kept searching for like two weeks, but nothing worked..

The Solution:
**************************************
However, I was determined to download it. I mean, I'm the developer, I WILL DOWNLOAD YOU!! It is ME OR YOU, OPENCV!!
Finally, after all the failures, I decided to consult my instructor, Mr. Tong NG..
Before I start, I would like to say THANK YOU one thousand times because with him, I finally made it. All the tutorials didn't explain this part well, I guess everyone assumed we had the perfect environment in our laptops.
I won't take long, here are the steps:

Remember: These instructions are for Mac OS X.
1- Download Xcode. You can find it in the App Store or simply click here. You can also find it in Apple's Developer website.
2- Make sure you have everything installed correctly. By that, I mean there are some things that are installed by default, and here where my problem was. You should download command line tools.
- Simply, run Xcode.
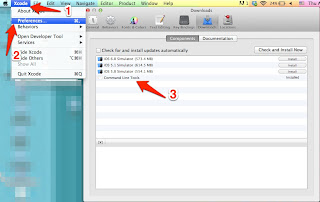
- Go to Xcode meny bar, then preferences.
- You will find something like this window, on Command Line Tools, click install.
3- Now, you should download something else called CMake. CMake can be downloaded from here. Preferably, use the dmg version.
Follow the instructions, and when you get this prompt, choose Install Command Line Links.

4- Now, download the version you want from OpenCV website, or click here. Download the version that says "For Linux/Mac".
Note: it is a .tar.gz , therefore, you will need to unzip it after you download it. You will get a folder with many files and folders inside.
<picture maybe?? >
5- Use the Terminal to download OpenCV. You can find the Terminal from Applications-->Utilities.
Follow this guide to install OpenCV using CMake.
"Getting the source code" part is the part where you will download OpenCV from the server. In our case, we have it downloaded and unzipped in a previous step.
----
Note: I'm not sure if it is related, but, I used the part where it says download subversion, and I did download it. If you managed to download it without these, please tell me in the comments below.
Now, you will have to go to the directory of OpenCV, which is the folder that resulted from unzipping the tar.gz file (using terminal of course). In terminal, you can use the simple command cd.
Then, you just need to follow what command lines written in the part "Use CMake to build" from the tutorial. You can easily copy and paste in the terminal, so use it ^^
And Wallaaaaaaaaaaa!!! You are supposedly by now have it installed correctly on your machine.
This is gonna be a a short blog as it is supposed to be a tutorial for my friends kekeke ^^.
The Problem:
**************************************
I'll get directly to the point!! almost three weeks ago, I had to install openCV library on my laptop for an assignment. I thought, well, it is a very VERY famous library.. it's gonna be a piece of cake.. Let's say, I THOUGHT WRONG!!!
Of course, I instantly went to my good friend Google for advice on how to install the library on a Mac OS X 10.8 (Mountain Lion) Macbook Pro. I got lots and LOTS of tutorial. I've actually kept searching for like two weeks, but nothing worked..
The Solution:
**************************************
However, I was determined to download it. I mean, I'm the developer, I WILL DOWNLOAD YOU!! It is ME OR YOU, OPENCV!!
Finally, after all the failures, I decided to consult my instructor, Mr. Tong NG..
Before I start, I would like to say THANK YOU one thousand times because with him, I finally made it. All the tutorials didn't explain this part well, I guess everyone assumed we had the perfect environment in our laptops.
I won't take long, here are the steps:
Remember: These instructions are for Mac OS X.
1- Download Xcode. You can find it in the App Store or simply click here. You can also find it in Apple's Developer website.
2- Make sure you have everything installed correctly. By that, I mean there are some things that are installed by default, and here where my problem was. You should download command line tools.
- Simply, run Xcode.
- Go to Xcode meny bar, then preferences.
- You will find something like this window, on Command Line Tools, click install.

3- Now, you should download something else called CMake. CMake can be downloaded from here. Preferably, use the dmg version.
Follow the instructions, and when you get this prompt, choose Install Command Line Links.

4- Now, download the version you want from OpenCV website, or click here. Download the version that says "For Linux/Mac".
Note: it is a .tar.gz , therefore, you will need to unzip it after you download it. You will get a folder with many files and folders inside.
<picture maybe?? >
5- Use the Terminal to download OpenCV. You can find the Terminal from Applications-->Utilities.
Follow this guide to install OpenCV using CMake.
"Getting the source code" part is the part where you will download OpenCV from the server. In our case, we have it downloaded and unzipped in a previous step.
----
Note: I'm not sure if it is related, but, I used the part where it says download subversion, and I did download it. If you managed to download it without these, please tell me in the comments below.
----Make sure you have subversion installed (built-in since Snow Leopard). If MacPorts is your primary package manager, use:sudo port install subversionif not using MacPorts or it gives an error, try:sudo fink install svn-sslMake sure you have cmake installed. This can also be installed with MacPorts:sudo port install cmake
Now, you will have to go to the directory of OpenCV, which is the folder that resulted from unzipping the tar.gz file (using terminal of course). In terminal, you can use the simple command cd.
Then, you just need to follow what command lines written in the part "Use CMake to build" from the tutorial. You can easily copy and paste in the terminal, so use it ^^
To use CMake to generate Unix Makefiles, type:# make a separate directory for building mkdir build cd build cmake -G "Unix Makefiles" ..
... (etc)
Finally, follow the usual "make, make install" method:
make -j8
sudo make install
And Wallaaaaaaaaaaa!!! You are supposedly by now have it installed correctly on your machine.
Dear my friends, if you face any problem, please comment below.
Regards,
- Cloud Le Programmer -
No comments:
Post a Comment